Teaching Examples

Instagram Teachers Pay Teachers Pinterest Blog Lovin' Facebook Image Map

Monday, November 11, 2019

Let's Talk About Book Clubs!!

As promised...I'm here today with a quick post about book clubs!  Increasing student motivation for reading and writing is a passion of mine.  I actually didn't realize just how passionate I was until I was scrolling my Google Drive account trying to free up storage space.  During my scroll session I found my master project on increasing student motivation for reading and writing.  Apparently I have always been passionate about increasing student motivation for all things literacy?? 

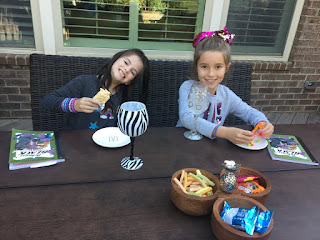
Now back to the book clubs...SO I started a book club with my little and one of her friends in our hood.  I wanted to instill a love of reading for both girls without it feeling so 'teachery'.  Kids today have to hustle ALL DAY LONG, so the last thing they would want is to come home from school only to continue with more school.  I did some research on high interest books knowing what both kiddos would find interesting, which is how I landed on the Princess in Black series.  At first I proposed the idea to my daughter.  She of course was super pumped because book clubs are what grownups do with friends.  Next, I reached out to the other little's mom and asked her thoughts/interests.  She said "sure."  Voila!  A book club was created.  The girls meet weekly to have a fun snack (anything out of the normal snacks you could expect after school), a fun 'grownup' style glass (filled with water), and a current book of interest.  The girls read at their own pace outside of book club.  When together we review what has happened since our last stopping point with the summarizing strategy of 'Somebody Wanted But So Then' and then read the next chapter together taking turns.  I facilitate the conversation asking both girls Depths of Knowledge (DOK) questions along the way.  Once a chapter or two has been read and discussed, both girls share out predictions about what's to come, favorite parts (and why), as well as anything tricky they encountered during their time outside of book club.  The total time spent doing book club is approximately 30 minutes.  Both kiddos are second graders, so the attention span/productivity starts to dissipate after the half hour marker. 

book club increase reading motivation elementary reading
The littles hanging out on the back deck enjoy snacks and a great book!


Book Clubs can happen ANYWHERE!  Here's what it could look like in the classroom:

  1. Send out an interest email to parents about setting up a book club.
  2. Select the students for the book club (low performing, needing challenged, sparking interest in reading, etc)
  3. Ask the selected group (or research yourself) about any books they've heard about being good; they would want to read in the club.
  4. Pick a time in the week to meet before or after school (whatever works with your schedule)
  5. Choose a fun snack to share with the group during or after book club time (the special treat gives it a non 'teachery' vibe)
  6. Depending on age, select a facilitator to ask questions before, during, and after each read.  The facilitator could be a rotating position if upper elementary.  They could actually do the preparing of questions prior to book club meetings and sticky note them in the book at the appropriate stopping points.  (I'm actually going to try this out for two book club meetings from now.  I will report back on how it works out.)
  7. Enjoy the ride of creating readers who want to read instead of have to read.
***THE BIGGEST TAKEAWAY~ DO NOT GO BROKE RUNNING A BOOK CLUB!!***
Starting a book club is super easy, low maintenance, and inexpensive.  Giving a small yummy treat once a week (even if it's on repeat) is exciting to kiddos.  They really just want some of your time in a smaller setting doing something special on a regular basis.

Parting Question~ Have you used book clubs in your classroom before?  Any tips you would like to share with us?

Monday, November 4, 2019

HELLO!!!

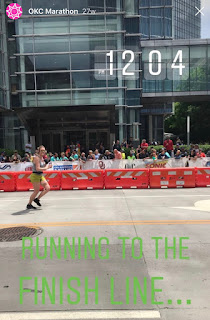
Yikes!  My last post was almost a year and a half ago!  I'm not sure where the time went, but I didn't deliver on content.  So sorry about that!  Since I last posted I have run the NYC Marathon (2018) as well as the OKC Marathon (2019).  My littles are getting bigger, and my responsibility has increased.  Currently, I am adjunct faculty at UNC Charlotte.  This Fall I have the privilege of teaching two sections of ELED 4121 (Differentiation and Assessment) to teacher candidates during their year long internship.  Teaching at UNCC has been such an incredible experience!  Bucket list material for sure!!  Did I mention I'm also serving on two boards (not at UNCC) AND facilitating a small group of professors on campus when class is not in session?

teacher runner nyc
My race results from the NYC Marathon 2018
fitness teacher runner nyc
Running in Central Park towards the NYC Marathon 2018 Finish Line!!
 

At the OKC Marathon Expo...26.2 is an incredible self discovery journey EVERYONE should take...at least once!


okc teacher runner
I'm ALL smiles running across any marathon finish line!  This picture was just seconds from me getting to the other side!  BIG marathons are my jam!
I have also spent the time on hiatus to figure out how to do it all each day while building time in for myself each day.  Self care is a non-negotiable!  I build most of my self care time in during the dark hours, but I still build it in EVERY. SINGLE. Day.  To be the best version of myself requires time to myself.  This was a challenging habit to build, but I'm so thankful I am thriving at it now! ;)  I've read countless books, blogs, articles, and podcasts on best productivity practices for this season of life.  The great news is....I THINK I have figured it out!  I have been batching tasks, scheduling my sleep, and taking notes for things to post about.  I have some pretty fabulous material coming your way. 

What can you expect moving forward???  You can expect a weekly post on an educational topic, life hack, fashion fun, or podcast/book recommendation.  My most favorite way to participate in social media is learning new things, outfit inspirations, anything to make my life easier, and new books/podcasts to consume. 

FINALLY...

I'm no longer on Facebook.  The newest algorithm to getting content accessible to followers has become too time consuming for me to participate in.  Unfortunately, the designers of my blog have decided NOT to do blogs any longer or help me take down the FB tab on the home page.  I'm definitely still around, just not on Facebook.  I DO have a podcast launch happening in late December.  More specifics to come. 

Friday, March 30, 2018

I'm BACK with a family hack...PROMISE!!

Hey There!  Are you still there?  I sure hope so!  I've been MIA from the blog the past 15  months...sorry about that!  NUTSO!!  Life went bonkers, and I needed to take a hiatus from all the extras in my life.  If you don't follow me on Instagram or Facebook then you will be surprised to know I had a baby in September!!!  Crazy, right?!  Our little man is the less than 1%!!  Over 980 days I went through countless appointments, meds, IUIs, a surgery, tears, anger, and tons of prayers to get our newest miracle.  I even lost a few friendships on the journey with "friends" who couldn't understand what I was going through.  Our fertility doctors had data reports from bloodwork and ultrasounds showing I couldn't have a second baby without 4 consecutive IVF treatments with at least 2 embryos each time.  I was "diagnosed" with secondary unexplained infertility.  WHATEVER is all I have to say about that!  Ha!  Clearly doctors don't know EVERYTHING like we oftentimes seem to think they do.  We put too much stock in what doctors tell us instead of just staying true to our beliefs knowing everything is on God's time...not ours.  God was definitely in control and had the timing perfect for our family. :) Initially I wanted children much closer in age than the almost 6 years difference, but I'm actually thankful for the large gap.  Our first miracle started kindergarten this year right before little man was born.  She had her own excitement happening with going to big girl school.  While she's at school each day, I have one on one time with little guy.  Both kiddos get their special time each day with just mom.  I never feel torn or overly exhausted doing the mom life with two kids.  Life with a new born and an elementary age kid has been fun, but an adjustment too.  That being said, there wasn't enough time to do it all until now!  Finally I feel like I have the time to refocus on creating for TPT and blogging about all things teaching, shopping, running, and family life.  Thanks for hanging in there with me!

Meet the LESS than 1% little man:

Baby G was born on Friday, September 8, 2017 in the same hospital room as his big sister at 10:55pm.  He weighed 8 pounds 4 ounces and was 20 1/2 inches long.  If you're a number person like me then he has a pretty awesome birthday (9+8=17).

The miracle himself just snoozing away in the hospital. 

I'm looking rough, but so was the experience this go round.  I'm definitely out of the baby machine business.  One of each is perfect for me. 


Now onto a simple family hack suggestion...

Like I mentioned previously, my little is in kindergarten now.  In my humble opinion she is the perfect age to help with the daily ritual of getting out the door for school.  Why should moms have to do it ALL...all the time?!  One morning while out for a run before the hectic school day morning started I realized my little could do her own meal prep.  Genius, RIGHT ?!?!  I meal prep my breakfasts/lunches each week, so why couldn't she prep her lunches for the week?  I had never been so excited to release one of my responsibilities off to a little person before.  When the weekend rolled around I went to the store to get the weekly groceries for the house.  Grocery shopping is exhausting. There isn't one perfect store for me to get everything on my list.  Instead I have the pleasure of going to Whole Foods, Publix, and occasionally Harris Teeter to get the shopping done.

On Sunday afternoon I had my little join me in the kitchen to teach her how she could create her own lunch yumminess each week by making lunches with me on Sundays.  She was instantly hooked, because SHE was in charge of a big something impacting her each day.  #momwin  Below are some pictures of her prepping the meals.  Each week I change the options with what I purchase at the store to keep things interesting for her.  You can see in the background some of my meal prepping going on too.  We are NOT a crockpot family, the hubby actually loathes any meal made in a crockpot; however, it works quickly to cook chicken for my salads each week.  I will put a post up on my simple meal prepping soon!  ;)

meal prep
I get out the food my little can choose to prep from.  She has choices from crunch, fruit, veggies, protein, etc.  She makes a total of 5 things from each group.  It doesn't matter to me the combinations, but needs to have 5 of each group to mix up the lunches each week.  

meal prep
People who know me best will tell you I can be quite the food "weirdo".  I consider it a compliment! ;) . Our daughter goes to public school where the population is a mixed bag of experiences; therefore, the food you will see in the cafeteria can be quite interesting to say the least.  Kids can be mean when it comes to food, so I had to figure out a way to balance it out  while not setting my kid up to be bullied.  In these pictures you see cookies from Whole Foods that look similar to things other kids will be packing.  She knows they are treats and not to expect them with every meal.

meal prep
This is the pull out drawer in our refrigerator.  Our little gets the left side of the drawer for HER meal prepped items.  Once the prepping is finished, she puts the food in the drawer for the week.  Each morning while I'm getting breakfast ready she packs her lunch.  She picks one protein, a dairy item, a veggie and/or fruit, something crunchy, and a sweet treat. 
Here are a list of things she typically chooses from each week (I keep these items in stock at the house when in season) in case you are looking for new lunch ideas for your crew:

  • Shrimp Cocktail (frozen bagged shrimp)
  • Rolled sliced lunch meet (rotate between turkey, ham, and chicken)
  • Turkey Jerky
  • Classic PB sandwich (no jelly) on a bagel thin
  • Mini Pancakes or Waffles (most weeks I have these made and in the freezer, but have been known to purchase when in a bind)
  • Sausage links (AppleGate is our go to)
  • Nuts (almonds, cashews, peanuts)
  • Pretzel Thins
  • Pirates Booty or Simply Cheetos 
  • Sweet Peppers/hummus
  • Carrot Chips/hummus
  • Sliced Cucumbers/ranch
  • Grape Tomatos
  • Apple Chips (I make them myself each week)
  • Goldfish (I buy the organic wheat/bagged type...very much a treat in our house)
  • Cheese sticks and baby bells
  • Yogurt Tubes (Stonyfield or Chobani)
  • Applesauce cups (Motts or Publix brand organic is how we roll)
  • Grapes
  • Blackberries, strawberries, blueberries
  • Sweet Treat (I try and bake cookies from scratch a few times a month, but WF comes to the rescue when I'm short on time)

Thanks for stopping by and I hope you will be back again soon!  I would love to hear your lunch ideas too for the kiddos!  Also, if you are struggling with infertility and need a listening ear, prayers, or have questions; reach out to me.  I would love to be part of your support system!  It's a lonely journey most will never understand!  Have a fantastic Easter weekend friends!
Thursday, November 24, 2016

A Few of My Newest Faves...

Happy Thanksgiving Ya'll!  There is so much to be thankful for on this beautiful day!  I'm thankful for each one of you that takes time to visit the blog, my TPT store, and all things social media. Thank YOU for your support over the years!

Today I wanted to share my experiences with a few products I had seen on the internet, but never had the opportunity to try out until now...Kwik Stix and Pencil Grips.  They are a MUST have when working with kids in your classroom or with your own kids at home.  The Pencil Grip company sent me a few samples to try out and share with you all.  Below are some pictures of the paint sticks and pencil grippers.


I knew Kwik Stix were fabulous for mess free art projects, but wanted to see how they could be used on the academic side of the classroom.  The children I worked with looked forward to our math intervention time because they were going to the have the opportunity to use something their peers didn't get to use.  Can you say, motivated kiddos?!  I've never seen a student work so hard for the "reward" of getting to use the paint sticks to color in ten frames, solve math problems, and use a number line.  It was MAGICAL!  Yes, kids can use markers or crayons to do the same thing, but then you lose the magical component.  Kids like to have things others don't...human nature for sure, and it's a huge motivator to do things that aren't so fun.  My advice to keep the magic in the stix is to pull them out randomly.  The beauty of these paint stix is the fact it's real tempera paint that doesn't bleed through paper...#winning and dries in less than 90 seconds.  No need to find a drying space in your classroom or at home for all the artwork!  Simply perfect for anyone who is a slight control freak like yours truly! ;)  If you go on Pinterest, you will find several cute art projects you can do (painting pumpkins is one of my favorites).

Stickers and Kwik Stix...genius and MESS FREE (click picture to be taken to original blog post on the craft)

solving math problems

drawing out pictures for word problems

using two different colors on ten frames to solve math equations

building numbers on a ten frame and connecting it to base ten blocks
I also used the Kwik Stix with my little nugget to practice weekly sight words.  This was another win for me because doing sight words with mom is no fun until now!  I never understood the power struggle parents would share with me at conferences when discussing getting homework done.  I always thought I wouldn't have those same struggles because, well I'm a teacher and I "know" how to keep kids on task; boy was I super wrong about that!  I have the exact same struggles as the parents I conferenced with.  What I decided must be the issue is my little knows I'm a teacher, but I'm her mom; therefore, I'm not in charge of her learning at school so why should she do "school" things with me?!  The kwik stix have helped remedy that mindset...thank goodness, because I wasn't sure if we were both going to even make it to kindergarten!  #thestruggleisrealfolks ;)

my little practicing her weekly sight words

tracing over sight words first written in pencil and then over with kwik stix

The other product I wanted to share with you are the pencil grips!  I have a few kiddos with handwriting so atrocious you can't read it!  Before the pencil grips I would suggest to parents Handwriting Without Tears; however, little did I know...a simple change in gripping a writing tool would correct most of the concerns.  I'm loving the gradual release design of the grippers.  The grippers meet your kid where they are currently at and get them to where they need to be.  
The gradual release grips that grow with your child

Gripper 1

Gripper 2

Gripper 3

As an Academic Coach I work with a variety of children in different grade levels; oftentimes, with terrible handwriting.  Teachers ask me to help with the academics and "if I could help with the handwriting that would be fabulous".  One teacher in particular noticed a huge difference in her student's writing in a few short days of the child using the gripper.  The gripper is also good for righties and lefties.  There is a R and L to guide the child to proper gripping for their needs.  The colors are fun and the grippers are squishy to make writing a more comfortable task.  Below are a few pictures of a child working on handwriting and trying out the different grips.  Over the past few weeks his handwriting has improved drastically and the teacher is thankful she is able to read what he writes. :) 
first try..."feels weird" 
second try..."feels a little better"
third try..."feels just 'write' ;)"
Now you are probably wondering where you can get these magical tools for the classroom or home? There are a few places you can go starting with online at Target, Amazon, and ThePencilGrip.  I'm pretty sure you will start seeing them inside Target stores as well, so next time you're there check out the arts and crafts section to grab you a set.  There are so many fun sets in thick and skinny sizes (metallic, neon, and classic colors).  

Stayed tuned for future posts on how I use the grippers and stix...Happy Thanksgiving friends!  Enjoy all of the wonderful blessings in your life!
Tuesday, September 27, 2016

Color Coding Reading Passages


Happy Tuesday Everyone!

Now the school year is back in full swing, I'm trusting most everyone is getting to the nitty gritty of reading comprehension in mini lessons and guided reading groups.  What am I talking about you ask? TEXT EVIDENCE.  Oh, how it can be such a frustrating phrase heard in education.  The Common Core is known for asking students to identify text evidence in both oral and written comprehension questions.  If you look on Pinterest or search the internet you will find an abundance of paid resources for students to practice finding text evidence in short reading passages.  I'm definitely guilty of purchasing my share of cutesy passages for homework and guided reading practice over the years. Well folks, this year I wised up and saved my money because we are building a house (and time) aint NOBODY got time for that creating passages and now prefer to use Readworks or Newsela instead.  


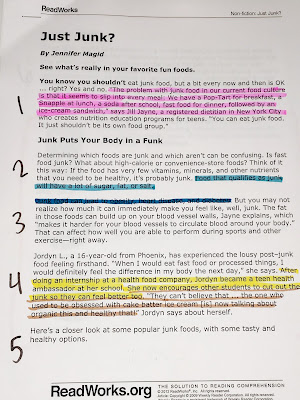
Are Readworks or Newsela cutesy?  Nope!  Not really; however it's free and does the job of providing did I mention FREE interesting leveled passages/articles for students to find text evidence with.  Now, I'm sure you might be sitting there thinking, how will I know what evidence students have found if there isn't directions for my students with cute little crayons beside each question?  I've got you covered!  In my classroom and with the students I work with this year, I control the colors for each question.  There's nothing complicated about it.  I just pick a few colors (crayons or markers) for the comprehension questions and ask students to color a dot for each number using the color I say (i.e.  put a red dot next to number one, and green dot next to number two, etc).  I stick to basic colors as much as possible because the goal is to keep it simple.  When students come to my guided reading table, I get out the smelly markers; because who doesn't love a good smelly marker?!  Research shows that when information is presented in color, people retain more of it.  The smelly markers are just the cherry on top because they are fun and not available at student desks.  Students actually get excited to meet with me because of the markers.  Who knew?!

Below is an example of a Readworks passage I'm currently working with a student on, so you can better visualize what I'm talking about.  Need to save paper?  You can print two pages to a page by simply changing the printer settings.

Inexpensive smelly markers you don't mind sharing with students

free reading passages
Text evidence highlighted to match color dot beside question number

Different colors for each question


So what do you need to get started?  Markers, passages printed for free from either ReadWorks or Newsela, and students to practice the text evidence.  Easy peasy my friends!  I hope I've shed some light on reading passages and text evidence.  The more money you save on cutesy passages, the more money you have for fun things like shoes or Target!  Until next time friends! :)

Friday, September 2, 2016

Brag Tags Post #2

Welcome Back!

I'm here to wrap up my thoughts on all things brag tags!  This is the second part (a little late) of my brag tag series. If you missed my first post, you can read all about it here.  Like I mentioned in my previous post we have a brag tag end of year celebration party.  Basically students have collected brag tags all year and get to spend an hour or so reminiscing over tags earned with friends and create necklaces with a variety of beads.  They have so much fun and it's so cute to listen to the conversations about the tags.

These kids were rockstars and kept up with the binder ring all year!!  I had 20 second graders last year and these 7 were responsible and kept up with the binder ring!  
If you remember from my previous post, I mentioned starting the year with binder rings for each kiddo to put brag tags on.  At the end of the year students exchange the binder rings for a beaded chain to create a unique brag tag necklace.  Now, you might be wondering what happens to the kids who have lost the binder ring at some point in the year???  That's a fabulous question!!  I DO NOT replace binder rings at any point in the year.  I make the expectation crystal clear at the beginning when I'm introducing brag tags.  If a student loses the ring they DO NOT get replacement tags; instead he/she will get a snack bag to keep tags in for the remainder of the year.  When it comes time to trade in rings for necklaces, students without a ring are given a piece of yarn to make the necklace. At the end of the day all students DO get to make a brag tag necklace; however, the material the necklace is made with depends on the student being responsible throughout the year.  Below are some pictures of materials to make the necklaces as well as pictures of my cuties at the end of the year necklace party!  My biggest piece of advise when starting brag tags is to play by rules you are comfortable with.  If you search brag tags on TPT or Pinterest, you will find thousands of variations which could be challenging/overwhelming to manage.  Keep it simple and do what you are most comfortable with!  A teacher on my team last year only used one specific brag tag.  In her classroom the children worked hard to see how many they could get during the year.  The beauty of brag tags is they are flexible and can be made easy to use based on individual teacher comfort.  If you would like to check out some brag tags I have in my TPT store click here.  I would love any comments about your experiences with brag tags. :)))
Materials for the necklaces.  The cheapest place for the chains was amazon or Hobby Lobby at a $1/necklance.

These are the specialty beads.  My thoughts were to keep it simple.  I bought the beads at Hobby Lobby using 40% off coupons.

I called one table at a time to the necklace making station to gather materials to take back to seat for necklace making.

Hard at work.

Students with the yarn making the necklaces.

If students needed more materials they could go back to the station and gather more materials.

Some of the brag tags

All students enjoyed making the necklaces and each was so cute and different.


Monday, August 1, 2016

All Things Brag Tag (Post 1 of a 2 part series)

Happy Monday Everyone!

I'm sure most of you are starting to go back in the classroom to get ready for B2S 2016!  As you begin to think about classroom management and student motivation, definitely consider using Brag Tags.  There are a plethora of blog posts out there on how to implement them as well as TPT sellers creating them, including me. ;)  I used them for the first time in my 2nd grade classroom last year and it was a game changer! It's a super cheap way to celebrate individual student success and change unwanted classroom behavior. Everyone likes to be praised right?!  Brag tags do just that and provide a visual reminder of student successes in the classroom.  Angie over at Lucky Little Learners was my initial inspiration to try them out.  She has some fabulous posts on how to implement them and there is definitely no reason to recreate the wheel over here, right??

Now, in the social media world there seems to be some backlash on using Brag Tags in the classroom because teachers don't want to create students who are "braggers".  Well friends, I called them brag tags all year and never once received any negative feedback from administrators, co-workers, parents, or students.  In fact, EVERYONE thought it was a genius idea and a few other teachers at my school jumped on board to do brag tags too!  HOWEVER, if this is a concern for you there are alternative names for the same tool/product.  Some teachers are calling them Swag Tags, Wow Tags, Fab Tags, etc.  Regardless of what you want to call them in your classroom, they are amazing!

So, how do they work you ask?  Well, that's up to you.  In my classroom I introduced brag tags on the last day of the first week of school.  I put them on student desks before they arrived to create excitement and questions about the tag.  I gave each student a 2 inch binder ring with one brag tag on it that said 2nd Grade Rocks.  As a class we went over how to earn a brag tag and how to be responsible with the brag tag ring.  I never told students which brag tags I had...it was a mystery all year and the students couldn't get enough of the tags.  They never knew when I would pass some out. It was fabulous!!!

As with anything new....I started out simple with brag tags for Daily 5 station behavior. Basically, as we were building stamina each day for the first 6 weeks of school, students were earning brag tags for demonstrating desired behaviors at each station.  Everybody wins!! In Thursday's post I will answer some FAQ about all things brag tag.  :)  My next type of tag I started to roll out was the homework tag.  I surprised the class with homework brag tags the first time I collected homework packets. Every student who turned in their homework packet received a brag tag.  The excitement continued and it was hook, line, sink in all things brag tag.  Once I had everyone's buy in, I began to slow down with passing out brag tags to only a few of the best of the best behaviors each day.  Students worked so hard to be the best of the best and my classroom was pure bliss!  Well, most of the time! ;)  I even had special substitute brag tags my assistant and sub would pass out in my absence.  Every. Single. Sub. LOVED the brag tags and how helpful it was with classroom behavior.  I'm not going to say the tags were miracle fixes, but for the most part it made a big difference in the majority of my student's behaviors.

My Daily 5 Inspired Brag Tags:


Now, lets discuss the binder ring for a minute...I made a point of stressing to the class to be responsible with the ring the very first day I passed out the tags.  They could hook the rings on backpacks, pant loops, keep them at home, or in the pencil boxes at school.  My classroom expectation was that students would keep up with the brag tag ring all year long.  At the end of the year students turned in the ring to me for a beaded chain necklace.  We will talk more about the necklaces and binder ring responsibilities in my post on Thursday.  If you go on Pinterest and search brag tags you will find a multitude of ways teachers display brag tags to give you some ideas if you're not feeling the student responsibility vibe.  I believe in student responsibility.  If you set your expectations high, most students will rise to meet or exceed your expectations.

I hope to have peaked your interest in at least considering brag tags.  Come back Thursday for a follow up post to how brag tags worked in my classroom.  See you then!